[Spring 2.5] Annotation (어노테이션)
by 무작정 개발2022.03.22(61일 차_화요일)
- 스프링(Spring) 2일 차 마지막 글
이번 글에서는 Annotation(어노테이션)에 정리할 것이다.
Annotation (어노테이션)
기존에는 dispatcher-servlet.xml에 bean 객체를 생성했다.
하지만 Annotation을 사용하면 dispatcher-servlet.xml에 객체를 생성하지 않아도 된다.
1. 객체 생성
- 어노테이션(Annotation)을 사용하지 않을 때 : 컨트롤러는 일단 객체를 생성 -> 객체를 불러서 사용
(1) 어노테이션(Annotation)을 사용하면 위 순서를 행하지 않아도 된다.
- dispatcher-servlet.xml에 객체를 생성하지 않아도 된다.
- 컨트롤러에서 @Controller 작성
//MainController이라는 이름으로 컨트롤러 객체 생성

@Controller
public class MainController {

}
(2) @Controller 이렇게만 쓰면 나중에 소스를 합칠 때 충돌이 날 수 있어서 구분 작업이 필요하다.
- main.mainController로 객체 생성
- 위의 이름은 사용자 정의
@Controller("main.mainController")
public class MainController {

}
2. 메서드 생성
(1) 기본 메서드 생성
- 접근 지정자는 public
- 리턴 값(return)은 String
- 기본적으로 가지고 있는 매개변수는 없다.
- 필요한 것만 매개변수 자리에 넣어서 사용 (스프링이 알아서 가져다 줌)
- 스프링에서는 메서드의 이름이 중요하지 않다.
- @RequestMapping(value="/주소", method={RequestMethod.GET/POST})
▷주소가 오면 하단 메서드 실행 / 메서드 방식은 GET 또는 POST
3. 어노테이션(Annotation) 사용 방법
package com.anno;

import org.springframework.stereotype.Controller;
import org.springframework.web.bind.annotation.RequestMapping;
import org.springframework.web.bind.annotation.RequestMethod;

//@Controller를 쓰면 extends가 필요없고 스프링한테 적당한 컨트롤러를 가져오라고 맡긴다.
//<bean name="listFormController" class="com.test.ListFormController"/> 이런식으로 @Controller를 써서 알아서 객체생성

//혼자 프로젝트를 하면 상관없지만 협업할때 프로젝트를 합치면 각자 만든 컨트롤러가 충돌할 수도 있다.
// 그래서 @Controller("bbs.mainController")식으로 써줘서 충돌방지 (패키지방식으로 이름을써준다)

@Controller("main.mainController")
@RequestMapping(value="/main.action") //이 주소를 치면 MainController이 실행된다.
public class MainController {

	//MainController main.Controller = new MainController();
	//MainController mainController = new MainController();


	//사용자가 /main.action을 치면 MainController 메서드가 실행되는데
	//넘어온 방식이 GET이면 이 method()를 실행시킨다.
	@RequestMapping(method=RequestMethod.GET)
	public String method() {

		return "/main"; // main.jsp로 가라 "/"생략가능
	}

}
Annotation을 사용하여 get방식 & post 방식을 사용하여 데이터 전송
여기서는
create.jsp -> result.jsp
insert.jsp -> result.jsp
save.jsp -> result.jsp
위의 방법대로 페이지가 이동할 것이고, 자세한 것은 하단에서 설명할 것이다.
result.jsp 페이지는 데이터를 출력할 페이지인데 공통으로 사용할 것이다.
1. TestCommand 클래스 생성
- 스프링의 DTO 역할
package com.anno;
//스프링의 DTO
public class TestCommand {

	private String userId;
	private String userName;
	private String mode;

    //getter / setter 생성
}
2. TestController 클래스 생성
- @Controller를 써서 컨트롤러 객체 생성
package com.anno;

import javax.servlet.http.HttpServletRequest;

import org.springframework.stereotype.Controller;
import org.springframework.web.bind.annotation.RequestMapping;
import org.springframework.web.bind.annotation.RequestMethod;

@Controller("anno.testController")
public class TestController {


	//MainController 에 @Request가 2개있는데 여기선 합쳐서쓴다.
	//사용자가 /demo/write.action을 치면 TestController메서드가 실행되는데 Get방식이면 write()메서드 실행
	@RequestMapping(value="/demo/write.action",method= {RequestMethod.GET}) //배열로 넘어온거기때문에 { } 써준다. /하지만 생략 가능
	public String write() throws Exception {

		return "anno/create";

	}

	@RequestMapping(value="/demo/write.action",method= {RequestMethod.POST})
	//이 주소가오면 post방식일때 이 메서드 write_ok() 를 실행
	public String write_ok(TestCommand command, HttpServletRequest request) { //스프링이 TestCommand객체를 생성하고 command에 데이터를 넣어서 보내준다.(자동)

		//데이터가 TestCommand에 담겨온다.
		String message = "아이디: " + command.getUserId();
		message += ", 이름: " + command.getUserName();

		//기존에는 request를 써서 넘겼지만 여기서는 스프링한테 달라고 한다.(매개변수 참고)
		request.setAttribute("message", message);


		return "anno/result";
	}


	//여기선 위의 2가지를 합쳐서 사용한다. save.jsp -> result.jsp
	@RequestMapping(value="/demo/save.action",
			method= {RequestMethod.GET, RequestMethod.POST})
	public String save(TestCommand command, HttpServletRequest request) throws Exception {

		//get방식으로 왔으면
		if(command==null||command.getMode()==null||command.getMode().equals("")) {

			return "anno/save";
		}

		String message = "이름: " + command.getUserName();
		message += ", 아이디: " + command.getUserId();

		request.setAttribute("message", message);

		return "anno/result";

	}


	//여기선 위의 2가지를 합쳐서 사용한다. insert.jsp -> result.jsp
	//위에서는 command를 한번에 받았는데 이번에는 하나하나 받아서 사용한다. - 이렇게 안쓰지만 예시로 한번 해본다.
	@RequestMapping(value="/demo/insert.action", //method를 안적어주면 Get이든 Post든
			method= {RequestMethod.GET, RequestMethod.POST})
	public String insert(String userId, String userName, String mode, HttpServletRequest request) throws Exception {

		//get방식으로 왔으면
		if(mode==null||mode.equals("")) {

			return "anno/insert";
		}

		String message = "이름: " + userName;
		message += ", 아이디: " + userId;

		request.setAttribute("message", message);

		return "anno/result";

	}

}
3. JSP 페이지 생성
(1) result.jsp 페이지 생성 (공통으로 사용 / 데이터 출력 페이지)
<%@ page contentType="text/html; charset=UTF-8"%>
<%@ taglib prefix="c" uri="http://java.sun.com/jsp/jstl/core" %>
<%
	request.setCharacterEncoding("UTF-8");
	String cp = request.getContextPath();
%>
<!DOCTYPE html PUBLIC "-//W3C//DTD HTML 4.01 Transitional//EN" "http://www.w3.org/TR/html4/loose.dtd">
<html>
<head>
<meta http-equiv="Content-Type" content="text/html; charset=UTF-8">
<title>Insert title here</title>
</head>
<body>

${message }

</body>
</html>
(2) create.jsp 페이지 생성
- create.jsp -> result.jsp
- create.jsp에서 result.jsp로 데이터를 post방식으로 넘긴다.
@RequestMapping(value="/demo/write.action",method= {RequestMethod.GET}) //배열로 넘어온거기때문에 { } 써준다. /하지만 생략 가능
	public String write() throws Exception {

		return "anno/create";

	}
위는 TestController 클래스에 있는 write() 메서드이다.
주소가 /demo/write.action이고, 방식이 get방식이면 anno안의 create(jsp생략)을 보여줘라는 뜻이다.
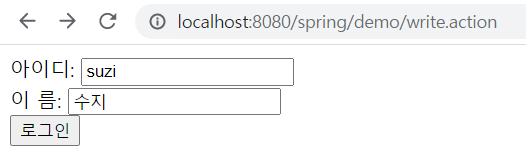
create.jsp
<body>

<form action="<%=cp%>/demo/write.action" method="post">

아이디: <input type="text" name="userId"/><br/>
이  름: <input type="text" name="userName"/><br/>
<input type="submit" value="로그인"/>

</form>

</body>
위는 create.jsp의 <body> 부분이다.
로그인 버튼 <input> type을 submit으로 해줬는데 submit은 action을 찾아간다.
<form action="<%=cp%>/demo/write.action" method="post">
위의 <form>을 통해 /demo/write.action으로 post방식으로 이동한다.
@RequestMapping(value="/demo/write.action",method= {RequestMethod.POST})
//이 주소가오면 post방식일때 이 메서드 write_ok() 를 실행
public String write_ok(TestCommand command, HttpServletRequest request) { //스프링이 TestCommand객체를 생성하고 command에 데이터를 넣어서 보내준다.(자동)
//데이터가 TestCommand에 담겨온다.
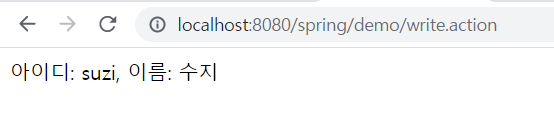
String message = "아이디: " + command.getUserId();
message += ", 이름: " + command.getUserName();
//기존에는 request를 써서 넘겼지만 여기서는 스프링한테 달라고 한다.(매개변수 참고)
request.setAttribute("message", message);
return "anno/result";
}위는 TestController클래스에 있는 write_ok() 메서드이다.
위의 form에서 /demo/write.action 주소가 와서 이 메서드가 실행되는 것이다.
여기서 스프링이 TestCommand 객체를 생성하고 command에 데이터를 넣어서 보내준다.(자동)
그래서 받아온 아이디, 비밀번호는 message에 넣어주고 setAttrubute로 변수 message에 message를 담아서 보낸다.
마지막 return "anno/result"; 에서 값을 가지고 anno안에 있는 result(. jsp생략)으로 넘어간다.
실행결과
다음으로
insert.jsp에서 result.jsp / save.jsp에서 result.jsp 방법 또한 위와 크게 다른 점은 없다.
그래서 자세한 설명은 생략하겠다.
insert.jsp
<%@ page contentType="text/html; charset=UTF-8"%>
<%@ taglib prefix="c" uri="http://java.sun.com/jsp/jstl/core" %>
<%
	request.setCharacterEncoding("UTF-8");
	String cp = request.getContextPath();
%>
<!DOCTYPE html PUBLIC "-//W3C//DTD HTML 4.01 Transitional//EN" "http://www.w3.org/TR/html4/loose.dtd">
<html>
<head>
<meta http-equiv="Content-Type" content="text/html; charset=UTF-8">
<title>Insert title here</title>
</head>
<body>

<form action="<%=cp%>/demo/insert.action" method="post">

아이디: <input type="text" name="userId"/><br/>
이  름: <input type="text" name="userName"/><br/>
<input type="hidden" name="mode" value="insert"/>

<input type="submit" value="로그인"/>

</form>

</body>
</html>
save.jsp
<%@ page contentType="text/html; charset=UTF-8"%>
<%@ taglib prefix="c" uri="http://java.sun.com/jsp/jstl/core" %>
<%
	request.setCharacterEncoding("UTF-8");
	String cp = request.getContextPath();
%>
<!DOCTYPE html PUBLIC "-//W3C//DTD HTML 4.01 Transitional//EN" "http://www.w3.org/TR/html4/loose.dtd">
<html>
<head>
<meta http-equiv="Content-Type" content="text/html; charset=UTF-8">
<title>Insert title here</title>
</head>
<body>

<form action="<%=cp%>/demo/save.action" method="post">

아이디: <input type="text" name="userId"/><br/>
이  름: <input type="text" name="userName"/><br/>
<input type="hidden" name="mode" value="insert"/>

<input type="submit" value="로그인"/>

</form>

</body>
</html>
자주 사용하는 어노테이션
@Component
- 자동으로 빈 등록
@Scope
자동으로 등록되는 빈의 범위 지정
- singleton, prototype, session …
@Required
- Setter 메서드에 지정해서 반드시 설정해야 하는 필수 프로퍼티 정의
@Autowired
- Setter 메서드, 생성자 메서드 또는 필드(프로퍼티)에 직접 설정해서 자동으로 의존성 주입이 수행되도록 구성
@Autowired with (required = false) Option
- 컨테이너가 자동으로 의존성 주입을 수행할 때 대상 Bean을 발견하지 못해도 오류를 발생시키지 않도록 설정
@Qualifier
- @Autowired와 함께 사용되어서 자동 의존성 주입이 수행될 대상 Bean을 구체적으로 설정
- 같은 타입의 Bean이 두 개 이상 등록된 경우 @Autowired에 발생할 수 있는 모호성 제거
@Resource
- @Autowired + @Qualifier와 같은 효과
어노테이션을 쓰기 전에는 dispatcher-servlet.xml에 하나하나 빈 객체 생성을 해줘서 소스가 길어져서 복잡하였는데
어노테이션을 쓰니 엄청 간편해졌다.
'Back-End > Spring Legacy' 카테고리의 다른 글
| STS 3 설치 및 세팅 핵심 정리 - Spring3.0 시작! (0) | 2022.03.24 |
|---|---|
| [Spring 2.5] 게시판 CRUD 만들기 (0) | 2022.03.23 |
| [Spring 2.5] AbstractWizardFormController, MultiTestController (0) | 2022.03.22 |
| [Spring 2.5] SimpleFormController (0) | 2022.03.22 |
| [Spring 2.5] DI, IoC 란? (0) | 2022.03.21 |
블로그의 정보
무작정 개발
무작정 개발