[Spring Boot] 스프링 부트 + MyBatis 게시판
by 무작정 개발2022.03.30(67일 차)
이번에는 SpringBoot + MyBatis를 활용한 게시판 제작에 대해 정리할 것이다.
스프링 부트에서는 스프링과 다르게 jsp를 사용하지 않고 html을 사용한다.
내장된 톰캣 서버도 jsp를 파상하지 않기 때문이다. 그래서 이번에는 html를 사용할 것이다.
스프링 부트에서도 jsp를 사용하는 방법이 있는데 다음 글에 정리할 것이다.

오늘의 수업 내용
1. 스프링 부트 프로젝트 생성


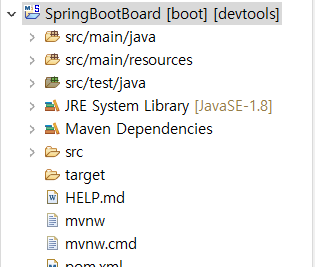
2. 스프링 부트의 파일 구조
스프링 부트는 스프링과 파일 구조가 조금 다르다.
- src/main/java : 패키지와 클래스 파일
- src/main/resource
- static : css/js 파일
- templates : html파일(표준)
- application.properties : 환경설정 파일
- pom.xml : Maven 라이브러리 설정 파일


위와 같은 패키지 구조로 만들 것이다.
3. application.properties 작성 - (스프링 부트 환경설정 파일)
(1) application.properties를 UTF-8로 변경하기
- apllication.properties 우클릭 -> Properties -> UTF-8로 변경 -> Apply and Close 클릭

(2) application.properties 작성
- 환경 설정 파일
- 여기서 Oracle DB 연결
- #이 붙은 부분은 주석
#http port
server.port=8080

//#db Connection(Oracle)
spring.datasource.driver-class-name=oracle.jdbc.driver.OracleDriver
spring.datasource.url=jdbc:oracle:thin:@localhost:1521:xe
spring.datasource.username=suzi
spring.datasource.password=a123

#thymeleaf auto refresh
spring.thymeleaf.cache=false

#mybatis mapping
mybatis.type-aliases-package=com.spring.boot.mapper

#mapper.xml location
mybatis.mapper-locations=/mybatis/mapper/**/*.xml
상단부터 설명을 해보겠다.
- 포트번호를 8080으로 디폴트 했다. 다른 번호로 변경 가능
- datasource는 DB 연결을 위해 입력
- thymeleaf (타임리프) 캐시를 설정함으로써 자동으로 지워지도록 함 (=false)
- 입력할 내용이 긴 경우, 생략하여 반복을 줄임으로써 효율성이 높아진다.
- xml 위치 정보를 기록 -> /**/*. xml을 씀으로써 xml로 끝나는 파일은 모두 해당된다는 의미
4. SpringBootBoardApplication 작성
이전 스프링에서 servlet-context에서 해주는 작업을 여기서 한다. (의존성 주입)
package com.spring.boot;

import javax.sql.DataSource;

import org.apache.ibatis.session.SqlSessionFactory;
import org.mybatis.spring.SqlSessionFactoryBean;
import org.springframework.boot.SpringApplication;
import org.springframework.boot.autoconfigure.SpringBootApplication;
import org.springframework.context.annotation.Bean;
import org.springframework.core.io.Resource;
import org.springframework.core.io.support.PathMatchingResourcePatternResolver;
/*
src/main/java : 패키지와 클래스 파일
src/main/resource
-static : css/js 파일
-templates : html파일(표준)
-application.properties : 환경설정파일
-pom.xml : Maven 라이브러리 설정파일
*/
@SpringBootApplication
public class SpringBootBoardApplication {

	public static void main(String[] args) { // main
		SpringApplication.run(SpringBootBoardApplication.class, args);
	}

	@Bean //이 메서드를 객체생성해줘야 한다.
	public SqlSessionFactory sqlSessionFactory(DataSource dataSource) throws Exception {

		SqlSessionFactoryBean sessionFactory = new SqlSessionFactoryBean();
		sessionFactory.setDataSource(dataSource); //의존성 주입 -servlet-context에서 해주는 작업

		Resource[] res = new PathMatchingResourcePatternResolver()
				.getResources("classpath:mybatis/mapper/*.xml");//*를써서 여러개xml을 받아서 배열씀

		sessionFactory.setMapperLocations(res);


		return sessionFactory.getObject();
		//.xml 형태의 모든 파일을 받기때문에 배열로 받는다.
		//만약 한가지만 받으면 배열로[] 받을 필요가 없다.
	}

}
SqlSessionFactory의 객체를 생성하고, DataSource를 의존성 주입(DI)한다.
Resource에는 sql을 입력한 xml 파일 위치 정보를 입력하고, 여러 개를 받을 경우에는 배열로 받아준다.
getResources()에는 경로를 입력해준다.
res는 setMapperLocations에 담는다.
마지막에 sessionFactory가 완성되고, DB 연결 객체를 오브젝트로 반환(return)
5. boardMapper.xml 생성 및 작성
위치 : src/main/resources => mybatis => mapper 안에 생성 ( mybatis, mapper 폴더도 만들어줘야 한다.)

boardMapper.xml
- sql 쿼리가 들어있는 xml 파일이다.
- namespace는 해당 패키 지명/인터페이스를 입력해야 한다.
- MyBatis
<?xml version="1.0" encoding="UTF-8"?>
<!DOCTYPE mapper
PUBLIC "-//mybatis.org//DTD Mapper 3.0//EN"
"http://mybatis.org/dtd/mybatis-3-mapper.dtd">

<mapper namespace="com.spring.boot.mapper.BoardMapper">

<select id="maxNum" resultType="int">
	select nvl(max(num),0) from board
</select>

<insert id="insertData" parameterType="com.spring.boot.dto.BoardDTO">
	insert into board (num,name,pwd,email,subject,content,ipAddr,
	hitCount,created) values (#{num},#{name},#{pwd},#{email},#{subject},
	#{content},#{ipAddr},0,sysdate)
</insert>

<select id="getDataCount" parameterType="hashMap" resultType="int">
	select nvl(count(*),0) from board
	where ${searchKey} like '%' || #{searchValue} || '%'
</select>

<select id="getLists" parameterType="map" resultType="com.spring.boot.dto.BoardDTO">
	select * from (
	select rownum rnum, data.* from (
	select num,name,subject,hitCount,
	to_char(created,'YYYY-MM-DD') created
	from board where ${searchKey} like '%' || #{searchValue} || '%'
	order by num desc) data)
<![CDATA[
	where rnum>=#{start} and rnum<=#{end}
]]>
</select>

<update id="updateHitCount" parameterType="int">
	update board set hitCount=hitCount+1 where num=#{num}
</update>

<select id="getReadData" parameterType="int" resultType="com.spring.boot.dto.BoardDTO">
	select num,name,pwd,email,subject,content,IpAddr,
	hitCount,created from board where num=#{num}
</select>

<update id="updateData" parameterType="com.spring.boot.dto.BoardDTO">
	update board set name=#{name},pwd=#{pwd},email=#{email},
	subject=#{subject},content=#{content} where num=#{num}
</update>

<delete id="deleteData" parameterType="int">
	delete board where num=#{num}
</delete>


</mapper>
6. BoardMapper.java / BoardService.java / BoardServiceImpl.java 생성 및 작성
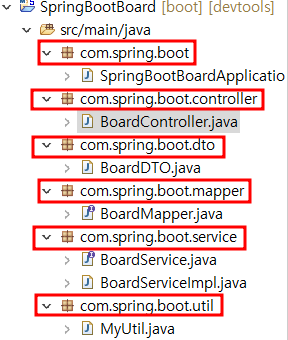
작성 전에 하단처럼 패키지 구조를 만들어 준다.
하단 사진처럼 패키지를 만들어주고 안에 파일을 생성할 것이다.
MyUtil.java는 이전에 만들었던 페이징 처리 클래스 / BoardDTO는 이전에 만들었던 클래스
위 2개의 파일은 이전 SpringWebMybatis 프로젝트에서 가져왔다.

(1) - BoardMapper.java (클래스)
- xml 내용을 가져오기 위해(Mapper로 등록) @Mapper -> 어노테이션(Annotation) 사용
- 여기에 있는 메서드 명은 boardMapper.xml에 있는 sql문의 id 값과 일치해야 한다.
package com.spring.boot.mapper;

import java.util.List;

import org.apache.ibatis.annotations.Mapper;

import com.spring.boot.dto.BoardDTO;

@Mapper //Mapper로 등록 시킨다.
public interface BoardMapper {

	public int maxNum() throws Exception;

	public void insertData(BoardDTO dto) throws Exception;

	public int getDataCount(String searchKey, String searchValue) throws Exception;

	public List<BoardDTO> getLists(int start,int end,
			String searchKey, String searchValue) throws Exception;

	public BoardDTO getReadData(int num) throws Exception;

	public void updateHitCount(int num) throws Exception;

	public void updateData(BoardDTO dto) throws Exception;

	public void deleteData(int num) throws Exception;

}
(2) - BoardService.java (인터페이스)
- BoardMapper 클래스와 메서드를 똑같이 복사한 서비스 인터페이스
- 의존성을 위한 파일 분리 작업
package com.spring.boot.service;

import java.util.List;

import com.spring.boot.dto.BoardDTO;

public interface BoardService {

	public int maxNum() throws Exception;

	public void insertData(BoardDTO dto) throws Exception;

	public int getDataCount(String searchKey, String searchValue) throws Exception;

	public List<BoardDTO> getLists(int start,int end,
			String searchKey, String searchValue) throws Exception;

	public BoardDTO getReadData(int num) throws Exception;

	public void updateHitCount(int num) throws Exception;

	public void updateData(BoardDTO dto) throws Exception;

	public void deleteData(int num) throws Exception;

}
(3) - BoardServicempl.java - (클래스)
- BoardService 인터페이스를 구현한 클래스
- BoardService 인터페이스를 상속 받음
- @Service (어노테이션)을 사용해서 객체 생성
- BoardMapper.xml를 의존성 주입을 해서 sql문을 읽어 온다.
- BoardService 인터페이스를 상속했기에 Override 해서 메서드를 가져오고 BoardMapper.xml의 sql문을 입력
package com.spring.boot.service;

import java.util.List;

import org.springframework.beans.factory.annotation.Autowired;
import org.springframework.stereotype.Service;

import com.spring.boot.dto.BoardDTO;
import com.spring.boot.mapper.BoardMapper;

//BoardService 인터페이스를 구현한 클래스
@Service //객체 생성
public class BoardServiceImpl implements BoardService{

	@Autowired	//boardMapper에 있는 sql문을 BoardServiceImpl로 읽어와서 의존성주입하여 객체생성 한것.
	private BoardMapper boardMapper; // BoardMapper의 의존성 주입


	//경로 : BoardController -> BoardService(I) -> BoardServiceImpl(C) ->
	//		 BoardMapper(I) -> boardMapper.xml


	@Override
	public int maxNum() throws Exception {
		return boardMapper.maxNum();
	}

	@Override
	public void insertData(BoardDTO dto) throws Exception {
		boardMapper.insertData(dto);
	}

	@Override
	public int getDataCount(String searchKey, String searchValue) throws Exception {
		return boardMapper.getDataCount(searchKey, searchValue);
	}

	@Override
	public List<BoardDTO> getLists(int start, int end, String searchKey, String searchValue) throws Exception {
		return boardMapper.getLists(start, end, searchKey, searchValue);
	}

	@Override
	public BoardDTO getReadData(int num) throws Exception {
		return boardMapper.getReadData(num);
	}

	@Override
	public void updateHitCount(int num) throws Exception {
		boardMapper.updateHitCount(num);
	}

	@Override
	public void updateData(BoardDTO dto) throws Exception {
		boardMapper.updateData(dto);
	}

	@Override
	public void deleteData(int num) throws Exception {
		boardMapper.deleteData(num);
	}

}
7. BoardController 클래스 생성 및 작성

컨트롤러 클래스 & 분배기 역할을 한다.
- 스프링 부트에서는 @RestController 어노테이션을 사용한다.
- sql쿼리를 가져오기 위해 @Resource 어노테이션을 통해 BoardService를 의존성 주입
- 의존성 주입을 함으로써 BoardService 안에 있는 BoardServiceImple도 딸려 온다.
- 스프링 부트에서는 무조건 ModelAndView 방식을 사용해서 데이터와 경로를 함께 보낸다.
package com.spring.boot.controller;

import java.net.URLDecoder;
import java.net.URLEncoder;
import java.util.List;

import javax.annotation.Resource;
import javax.servlet.http.HttpServletRequest;

import org.springframework.beans.factory.annotation.Autowired;
import org.springframework.web.bind.annotation.RequestMapping;
import org.springframework.web.bind.annotation.RequestMethod;
import org.springframework.web.bind.annotation.RestController;
import org.springframework.web.servlet.ModelAndView;

import com.spring.boot.dto.BoardDTO;
import com.spring.boot.service.BoardService;
import com.spring.boot.util.MyUtil;

@RestController
public class BoardController {

	@Resource
	private BoardService boardService; //얘를 호출하면 BoardServiceImpl이 딸려들어옴

	@Autowired
	MyUtil myUtil; //@Service로 구현된 MyUtil을 불러온것

	@RequestMapping(value = "/")
	public ModelAndView index() throws Exception{

		ModelAndView mav = new ModelAndView();

		mav.setViewName("index"); //jsp(html)로 갈때는 setViewName // class로 갈때는 setView

		return mav;
	}

	@RequestMapping(value = "/created.action", method = RequestMethod.GET)
	public ModelAndView created() throws Exception{

		ModelAndView mav = new ModelAndView();

		mav.setViewName("bbs/created"); //jsp(html)로 갈때는 setViewName // class로 갈때는 setView

		return mav;
	}

	@RequestMapping(value = "/created.action", method = RequestMethod.POST)
	public ModelAndView created_ok(BoardDTO dto, HttpServletRequest request) throws Exception{

		ModelAndView mav = new ModelAndView();

		int maxNum = boardService.maxNum();

		dto.setNum(maxNum + 1);
		dto.setIpAddr(request.getRemoteAddr());

		boardService.insertData(dto);

		mav.setViewName("redirect:/list.action");

		return mav;

	}

	@RequestMapping(value = "/list.action",
			method = {RequestMethod.GET,RequestMethod.POST})
	public ModelAndView list(BoardDTO dto, HttpServletRequest request) throws Exception{

		String pageNum = request.getParameter("pageNum");//문자만 따온건가?

		int currentPage = 1;

		if(pageNum!=null)
			currentPage = Integer.parseInt(pageNum);

		String searchKey = request.getParameter("searchKey");
		String searchValue = request.getParameter("searchValue");

		if(searchValue==null) {
			searchKey = "subject";
			searchValue = "";
		}else {
			if(request.getMethod().equalsIgnoreCase("GET")) {
				searchValue = URLDecoder.decode(searchValue, "UTF-8");
			}
		}

		int dataCount = boardService.getDataCount(searchKey, searchValue);

		int numPerPage = 5;
		int totalPage = myUtil.getPageCount(numPerPage, dataCount);

		if(currentPage>totalPage)
			currentPage = totalPage;

		int start = (currentPage-1)*numPerPage+1; // 1 6 11 16
		int end = currentPage*numPerPage;

		List<BoardDTO> lists = boardService.getLists(start, end, searchKey, searchValue);

		String param = "";

		if(searchValue!=null&&!searchValue.equals("")) { //널을 찾아내지 못하는경우가 있기때문에 양쪽에 부정문을 써준다.
			param = "searchKey=" + searchKey;
			param+= "&searchValue=" + URLEncoder.encode(searchValue, "UTF-8");
		}

		String listUrl = "/list.action";

		if(!param.equals("")) {
			listUrl += "?" + param;
		}

		String pageIndexList = myUtil.pageIndexList(currentPage, totalPage, listUrl);

		String articleUrl = "/article.action?pageNum=" + currentPage;

		if(!param.equals("")) {
			articleUrl += "&" + param;
		}

		/*
		request.setAttribute("lists", lists);
		request.setAttribute("articleUrl", articleUrl);
		request.setAttribute("pageIndexList", pageIndexList);
		request.setAttribute("dataCount", dataCount);

		return "bbs/list";
		*/
		//ModelAndView로 전송
		ModelAndView mav = new ModelAndView();

		mav.addObject("lists", lists);
		mav.addObject("articleUrl", articleUrl);
		mav.addObject("pageIndexList", pageIndexList);
		mav.addObject("dataCount", dataCount);

		mav.setViewName("bbs/list");

		return mav;
	}

	@RequestMapping(value = "/article.action",
			method = {RequestMethod.GET,RequestMethod.POST})
	public ModelAndView article(HttpServletRequest request) throws Exception{

		int num = Integer.parseInt(request.getParameter("num"));
		String pageNum = request.getParameter("pageNum");

		String searchKey = request.getParameter("searchKey");
		String searchValue = request.getParameter("searchValue");

		if(searchValue!=null) {
			searchValue = URLDecoder.decode(searchValue, "UTF-8");
		}

		boardService.updateHitCount(num);

		BoardDTO dto = boardService.getReadData(num);

		if(dto==null) {

			ModelAndView mav = new ModelAndView();
			mav.setViewName("redirect:/list.action?pageNum=" + pageNum);
			return mav;
			//return "redirect:/list.action"; 반환값이 String 일때 이렇게 써주고 모델엔뷰니깐 위처럼
		}

		int lineSu = dto.getContent().split("\n").length;


		String param = "pageNum=" + pageNum;
		if(searchValue!=null&&!searchValue.equals("")) { //검색을 했다는뜻

			param += "&searchKey=" + searchKey;
			param += "&searchValue=" + URLEncoder.encode(searchValue, "UTF-8");
	}

	//모델엔뷰는 String을 받아내지 못한다.	ModelAndView mav = new ModelAndView();

		ModelAndView mav = new ModelAndView();

		mav.addObject("dto", dto);
		mav.addObject("params", param);
		mav.addObject("lineSu", lineSu);
		mav.addObject("pageNum", pageNum);

		mav.setViewName("bbs/article");

		return mav;

	}

	@RequestMapping(value = "/updated.action",
			method = {RequestMethod.GET,RequestMethod.POST})
	public ModelAndView updated(HttpServletRequest request) throws Exception{

		int num = Integer.parseInt(request.getParameter("num"));
	  	String pageNum = request.getParameter("pageNum");


	  	String searchKey = request.getParameter("searchKey");
	  	String searchValue = request.getParameter("searchValue");

	  	if(searchValue!=null) {
		  	searchValue = URLDecoder.decode(searchValue, "UTF-8");
	  	}

	  	BoardDTO dto = boardService.getReadData(num);

		if(dto==null) {

			ModelAndView mav = new ModelAndView();
			mav.setViewName("redirect:/list.action?pageNum=" + pageNum);
			return mav;
			//return "redirect:/list.action"; 반환값이 String 일때 이렇게 써주고 모델엔뷰니깐 위처럼
		}

		String param = "pageNum=" + pageNum;

		if(searchValue!=null&&!searchValue.equals("")) {
			param += "&searchKey=" +searchKey;
			param += "&searchValue=" + URLEncoder.encode(searchValue, "UTF-8");
		}

		/*
		request.setAttribute("dto", dto);
		request.setAttribute("pageNum", pageNum);
		request.setAttribute("params", param);
		request.setAttribute("searchKey", searchKey);
		request.setAttribute("searchValue", searchValue);

		return "bbs/updated";
		*/
		//모델앤뷰 전송방식
		ModelAndView mav = new ModelAndView();

		mav.addObject("dto", dto);
		mav.addObject("pageNum", pageNum);
		mav.addObject("params", param);
		mav.addObject("searchKey", searchKey);
		mav.addObject("searchValue", searchValue);

		mav.setViewName("bbs/updated");

		return mav;

	}

	@RequestMapping(value = "/updated_ok.action",
			method = {RequestMethod.GET,RequestMethod.POST})
	public ModelAndView updated_ok(BoardDTO dto, HttpServletRequest request) throws Exception{

		String pageNum = request.getParameter("pageNum");

		String searchKey = request.getParameter("searchKey");
		String searchValue = request.getParameter("searchValue");

		dto.setContent(dto.getContent().replaceAll( "<br/>", "\r\n"));

		boardService.updateData(dto);

		String param = "?pageNum=" + pageNum;

		if(searchValue!=null&&!searchValue.equals("")) {
			param += "&searchKey=" + searchKey;
			param += "&searchValue=" + URLEncoder.encode(searchValue, "UTF-8");
		}
		//ModelAndView는 데이터랑 경로가 같이 넘어갈때 사용 여긴 데이터가 안넘어가니깐 경로만 반환해주면됌
		ModelAndView mav = new ModelAndView();

		mav.setViewName("redirect:/list.action" + param);

		return mav;
  }


	@RequestMapping(value = "/deleted_ok.action",
			method = {RequestMethod.GET,RequestMethod.POST})
	public ModelAndView deleted_ok(HttpServletRequest request) throws Exception{

		int num = Integer.parseInt(request.getParameter("num"));
		String pageNum = request.getParameter("pageNum");

		String searchKey = request.getParameter("searchKey");
		String searchValue = request.getParameter("searchValue");

		boardService.deleteData(num);

		String param = "?pageNum=" + pageNum;

		if(searchValue!=null&&!searchValue.equals("")) {
			param += "&searchKey=" + searchKey;
			param += "&searchValue=" + URLEncoder.encode(searchValue, "UTF-8");
		}
		ModelAndView mav = new ModelAndView();

		mav.setViewName("redirect:/list.action" + param);

		return mav;

	}
}
8. static 폴더에 css, js폴더 생성

css 폴더와 js폴더 및 파일은 이전에 SpringWebMybatis 프로젝트에서 그대로 가져왔다.
스프링과 스프링 부트는 css와 js폴더 위치가 다르니 주의
9. View 페이지 생성 (HTML 페이지)
기존 스프링에서는 JSP파일을 생성했지만 스프링 부트에서는 HTML 파일로 생성해야 한다.

여기서 기존 스프링과 다른 점이 또 있다.
기존 스프링에서는 JSTL을 사용했지만 스프링 부트에서는 thymeleaf(타임리프)를 사용한다.
처음에 application.properties (스프링 부트 환경설정 파일)에서 thymeleaf를 사용할 수 있게 해 주었다.
4개의 페이지 중에 list.html로 대표로 뽑아 설명해보겠다.
list.html
- 타임 리프 사용

먼저 <Head> 쪽에 thymeleaf(타임리프) 사용을 위해 위처럼 작성해줘야 한다.
JSTL을 사용할 때처럼 작성해주면 된다.

<body> 안의 list 출력 부분을 보자.
기존에 list 페이지에서는 데이터가 있으면 제목/이름/날짜/조회수를 보여주고, 데이터가 없으면
등록된 게시물이 없습니다. 를 출력한다. 타임 리프를 사용할 때는 th: 를 쓴다.
th:if는 JSTL에서 쓰던 것과 같이 if문과 동일하다. lists가 0보다 크면 있는 만큼 view에 뿌려준다.
나머지는 하단의 실행 화면과 비교하면서 보면 쉽게 이해할 수 있다.

article, created, updated.html 파일과 프로젝트 전체 소스코드는 하단 GitHub 링크 참고
https://github.com/chaehyuenwoo/SpringBoot/tree/main/SpringBootBoard
GitHub - chaehyuenwoo/SpringBoot: SpringBoot_Study
SpringBoot_Study. Contribute to chaehyuenwoo/SpringBoot development by creating an account on GitHub.
github.com
프로젝트 폴더 명 : SpringBootBoard
다음 글에서는 스프링 부트에서 JSP 파일을 사용하는 방법에 대해 정리할 예정이다.
'Back-End > SpringBoot' 카테고리의 다른 글
| @Controller와 @RestController 차이점 (2) | 2022.11.03 |
|---|---|
| @Autowired vs @RequiredArgsConstructor vs @Resource 차이점 (3) | 2022.10.14 |
| [Spring boot] 프로젝트 패키지 구조 (0) | 2022.09.15 |
| [Spring Boot] 스프링 부트에서 JSP 사용하기(JSP파싱) (1) | 2022.04.01 |
| [Spring Boot] 스프링 부트 기초 개념 (0) | 2022.03.30 |
블로그의 정보
무작정 개발
무작정 개발